Showing posts with label web. Show all posts

Sunday, January 1, 2012

Making an image transparent with GIMP

I'm not a graphic designer, so if I need an image for my website, like a loading animation or an "error" icon, I'll often just do a Google image search. One quality that I look for in images is that they have transparent backgrounds. Images with transparent backgrounds tend to look nicer because they allow the background color or background image of the website to show through the image. Images without such backgrounds are surrounded by an ugly white square.

An image without a transparent background.

However, it is possible to add transparency to a non-transparent image. I'll show you how to do this using the free, open-source GIMP image editor.

  1. After opening the image, the first thing to do is add an alpha channel. This is a special layer in the image that defines exactly where the image is transparent. Go to "Layer > Transparency > Add Alpha Channel"

    Adding an alpha channel.
  2. Next, select the parts of the image that you want to make transparent. This can be done using the Fuzzy Select Tool. This tool will select all parts of the image that are similar in color to the part of the image that you click on. You can increase or decrease the sensitivity of this tool by adjusting the Threshold setting (this is helpful if the background is similar in color to the foreground).

    The Fuzzy Select tool
  3. Then, go to "Edit > Clear". This will delete everything that you've selected with the Fuzzy Select Tool and expose the transparency layer.

    The image after the background was cleared.
  4. You're now ready to save your changes. If the image is a JPEG, you'll have to save it in a different format because JPEGs do not support transparency. PNG supports all levels of transparency, so, for example, you can make one part of your image 100% transparent and another part 30% transparent. The GIF format supports complete transparency, but not partial transparency like PNG does. GIF images do not support many colors, however, so if you are making a JPEG image transparent, it's best to save it as a PNG because JPEGs tend to have a lot of colors in them.

The webpage background can be viewed through transparent images.

Tuesday, September 13, 2011

The Play Framework - Part 4

The Play Framework is a MVC web application framework for Java that focuses on being light-weight and easy to use--two qualities that you don't see very often in the Java web application world.


A special template syntax is used to link to other pages in the application (the actual URL of the page is not used). This makes things more flexible, because you can change the page's URL in the "conf/routes" file without having to go through each template file and edit all the links that point to that page. Take this example:

Template file:

<a href="@{Application.index()}">Home</a>

"conf/routes" file:

GET  /home   Application.index

Generated HTML:

<a href="/home">Home</a>

Play sees that the Application.index method is assigned to the URL "/home" and generates the appropriate HTML when a user requests the page.

To access a static resource (like images, Javascript files, and CSS files), put the path to that resource in single quotes. With Play, all static resources go in the "public" directory.

<script src="@{'/public/javascripts/jquery-1.4.2.min.js'}"></script>

As with seemingly every type of file in a Play application, any changes made to the "conf/routes" file while the application is running are applied immediately. No restart is needed.

The "form" template tag can be used to create HTML forms:

#{form @Application.postComment(post.id)}
  Name: <input type="text" name="author" value="${params.author}" />
  <input type="submit" value="Post" />
#{/form}

This ends up adding two more attributes to the generated <form> tag ("accept-charset" and "enctype") and also adds a hidden parameter called "authenticityToken" (probably used for security purposes). You can also add attributes of your own, by supplying them as tag parameters after the action URL:

#{form @Application.postComment(post.id), onsubmit:'return validateForm()'}

Monday, September 5, 2011

The Play Framework - Part 2 - Database

The Play Framework is a MVC web application framework for Java that focuses on being light-weight and easy to use--two qualities that you don't see very often in the Java web application world.


To connect your application to a database, modify the "db.*" settings in the "conf/application.conf" file. To get up and running quickly, uncomment the "db=mem" line to create an in-memory database (all changes will be lost, of course, when the application ends).

To save data to the database, start by creating entity classes inside the "model" package. An entity class is a plain Java bean class that has JPA (Java Persistence Architecture) annotations. Each entity class represents a table in the database, each instance of the class represents a row in the table, and each field in the instance represents a column in the row (getter and setter methods aren't needed for the fields--Play generates them automatically). By default, the table name is the same as the class name. To change the table name, use the @Table annotation.

Each entity class can also optionally extend Play's Model class, which gives it access to utility methods for saving and retrieving data. For example, to insert a new row into the table, simply create a new instance of the class and call the save() method:

User user = new User("Bob", "bob@gmail.com");
user.save();

To retrieve data, call the static find() method:

List<User> users = User.find("byNameAndEmail", "Bob", "bob@gmail.com").fetch();

You don't need to write any SQL code to interact with the database. Play uses Hibernate for its persistence layer, so HQL (Hibernate Query Language) can be used for more complex queries.

The Model class also automatically generates an "id" primary key column for you (something that every table should have). So basically, you should always extend this class.

Here's an example of an entity class. It represents a blog post:

package models;
import java.util.*;
import javax.persistence.*;
import play.db.jpa.*;

@Entity
@Table(name="blog_posts")
public class Post extends Model {
  public String title;
  public Date postedAt;

  @Lob
  //large amount of text
  public String content;

  @ManyToOne
  //many Posts can belong to one User
  public User author;

  //a list of all comments that belong to this post
  //(the comments are in a separate table)
  //CascadeType.ALL = the post's comments will be automatically deleted when the post is deleted
  @OneToMany(mappedBy="post", cascade=CascadeType.ALL)
  public List<Comment> comments;

  public Post(User author, String title, String content) {
    comments = new ArrayList<Comment>();
    this.author = author;
    this.title = title;
    this.content = content;
    postedAt = new Date();
  }

  public Post addComment(String author, String content){
    Comment newComment = new Comment(this, author, content).save();
    comments.add(newComment);
    save();
    return this;
  }
}

The Fixtures class provides more utility methods for interacting with the database. For example, to delete the entire database, call the deleteDatabase() method. It can also execute SQL code contained in a file or persist the data in a specially-formatted YAML file (YAML is a new standard for representing structured data. Its aim is to provide a better alternative to XML).

Sunday, September 4, 2011

The Play Framework

The Play Framework is a MVC web application framework for Java that focuses on being light-weight and easy to use--two qualities that you don't see very often in the Java web application world. Writing a web application in Java has always been more complicated than, say, writing a web application in PHP.

The first thing you must do after downloading the Play framework is configure your path so that you can invoke the "play" executable:

PATH=$PATH:/home/user/play-1.2.2

Everything you do with Play is done through this play executable.

To create a new application, run this command:

play new appName

This creates a folder in the current directory with the same name as the application. The folder is populated with the basic scaffolding needed for a Play application.

You can immediately run this application too. To run the application, execute this command:

play run appName

This will start up a web server and run your application at "http://localhost:9000". You don't need any web servers of your own, everything is bundled within the framework (you don't even need a JavaEE web container like Tomcat). The only thing you need to run Play is a JRE.

Note that, if you get an error that says, "ERROR ~ Could not bind on port 9000", then something on your computer must be using port 9000. Port 9000 is the default port Play uses to run the application. This setting is defined in "conf/application.conf" under the "http.port" setting (be sure to uncomment the line too--remove the "#" at the beginning of the line to uncomment it). I changed the port to 9001 because 9000 didn't work for me.

Notice the line that says, "Listening for transport dt_socket at address: 8000", when the application is starting up. This means the web application has opened a port which allows you to debug the application as it is running using an IDE like Eclipse.

After it successfully starts up, open a web browser and navigate to "http://localhost:9001". When the web application gets its first request, it compiles all the Java code and template code in the application for you (it saves the .class files to the "tmp" directory). You don't have to manually compile any of the .java files yourself like in a normal JavaEE web application. If you change any Java code or template code while the application is running, the application will detect this and automatically recompile it for you. You don't have to restart the application. This is how the web application behaves in DEV (development) mode (the default). If started in PROD (production) mode, then this is not done in order to increase performance.

The application's unit tests (in the "test" folder) can be run from the web application itself. To do this, execute this command:

play test appName

This will start the web application and also enable the unit test functionality at "http://localhost:9001/@tests". The page displays all available tests and lets you select which tests to run.

Eclipse Integration

You can edit all of the files in a basic text editor of course, but for serious development work, this can be tedious. To configure the Play application for Eclipse, execute this command:

play eclipsify appName

This will create all the necessary configuration files (such as the ".project" file) needed to open the application as an Eclipse project. It also creates a directory named "eclipse", which contains launch configurations that can be run from Eclipse:
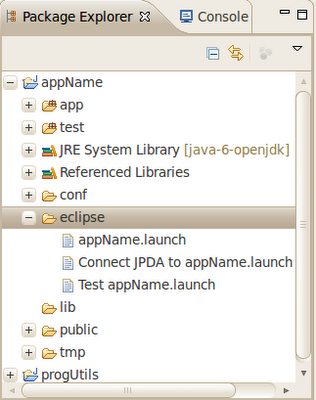
  • appName.launch - Running this has the same effect as running play run appName from the command line (it starts up the web application). To run it, right-click on it and select "Run As > appName".
  • Connect JPDA to appName.launch - This will connect Eclipse to the JPDA port (8000) while the application is running and allow you to debug the application in Eclipse. Note that the application must already be running for this to work. To run it, right-click on it and select "Debug As > Connect JPDA to appName". Go to the "Debug" perspective in Eclipse to see if it connected properly (you can see all the different web server threads in the upper-left hand corner).
  • Test appName.launch - Running this has the same effect as running play test appName from the command line. To run it, right-click on it and select "Run As > Test appName". Make sure that you first shut down the web application if you had already started it using "appName.launch".

Import the project into Eclipse by going to "File > Import..." and then selecting "Existing Projects into Workspace".

If you try to open some of the template files (the .html files in "app/views") in Eclipse, some files will display an error that says, "Character encoding "${_response_encoding}" is not supported by this platform." This is because Eclipse considers the file to be an HTML file and it looks at the <meta> tag to determine the character encoding of the file (even though the file has a ".html" extension and has HTML tags, it isn't really an HTML file--Play uses a special templating engine that has a special syntax). Well, the character encoding here is defined as a template variable, so Eclipse sees the variable name and gets confused. Click the "Set Encoding..." button and set the encoding to "UTF-8".