The Play Framework is a MVC web application framework for Java that focuses on being light-weight and easy to use--two qualities that you don't see very often in the Java web application world. Writing a web application in Java has always been more complicated than, say, writing a web application in PHP.
The first thing you must do after downloading the Play framework is configure your path so that you can invoke the "play" executable:
PATH=$PATH:/home/user/play-1.2.2
Everything you do with Play is done through this play executable.
To create a new application, run this command:
play new appName
This creates a folder in the current directory with the same name as the application. The folder is populated with the basic scaffolding needed for a Play application.
You can immediately run this application too. To run the application, execute this command:
play run appName
This will start up a web server and run your application at "http://localhost:9000". You don't need any web servers of your own, everything is bundled within the framework (you don't even need a JavaEE web container like Tomcat). The only thing you need to run Play is a JRE.
Note that, if you get an error that says, "ERROR ~ Could not bind on port 9000", then something on your computer must be using port 9000. Port 9000 is the default port Play uses to run the application. This setting is defined in "conf/application.conf" under the "http.port" setting (be sure to uncomment the line too--remove the "#" at the beginning of the line to uncomment it). I changed the port to 9001 because 9000 didn't work for me.
Notice the line that says, "Listening for transport dt_socket at address: 8000", when the application is starting up. This means the web application has opened a port which allows you to debug the application as it is running using an IDE like Eclipse.
After it successfully starts up, open a web browser and navigate to "http://localhost:9001". When the web application gets its first request, it compiles all the Java code and template code in the application for you (it saves the .class files to the "tmp" directory). You don't have to manually compile any of the .java files yourself like in a normal JavaEE web application. If you change any Java code or template code while the application is running, the application will detect this and automatically recompile it for you. You don't have to restart the application. This is how the web application behaves in DEV (development) mode (the default). If started in PROD (production) mode, then this is not done in order to increase performance.
The application's unit tests (in the "test" folder) can be run from the web application itself. To do this, execute this command:
play test appName
This will start the web application and also enable the unit test functionality at "http://localhost:9001/@tests". The page displays all available tests and lets you select which tests to run.
Eclipse Integration
You can edit all of the files in a basic text editor of course, but for serious development work, this can be tedious. To configure the Play application for Eclipse, execute this command:
play eclipsify appName
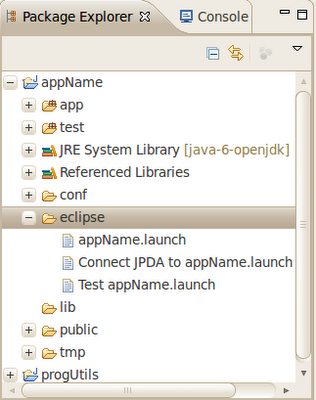
This will create all the necessary configuration files (such as the ".project" file) needed to open the application as an Eclipse project. It also creates a directory named "eclipse", which contains launch configurations that can be run from Eclipse:

- appName.launch - Running this has the same effect as running
play run appName from the command line (it starts up the web application). To run it, right-click on it and select "Run As > appName".
- Connect JPDA to appName.launch - This will connect Eclipse to the JPDA port (8000) while the application is running and allow you to debug the application in Eclipse. Note that the application must already be running for this to work. To run it, right-click on it and select "Debug As > Connect JPDA to appName". Go to the "Debug" perspective in Eclipse to see if it connected properly (you can see all the different web server threads in the upper-left hand corner).
- Test appName.launch - Running this has the same effect as running
play test appName from the command line. To run it, right-click on it and select "Run As > Test appName". Make sure that you first shut down the web application if you had already started it using "appName.launch".
Import the project into Eclipse by going to "File > Import..." and then selecting "Existing Projects into Workspace".
If you try to open some of the template files (the .html files in "app/views") in Eclipse, some files will display an error that says, "Character encoding "${_response_encoding}" is not supported by this platform." This is because Eclipse considers the file to be an HTML file and it looks at the <meta> tag to determine the character encoding of the file (even though the file has a ".html" extension and has HTML tags, it isn't really an HTML file--Play uses a special templating engine that has a special syntax). Well, the character encoding here is defined as a template variable, so Eclipse sees the variable name and gets confused. Click the "Set Encoding..." button and set the encoding to "UTF-8".


